JD Edwards Users Creation with Orchestrator
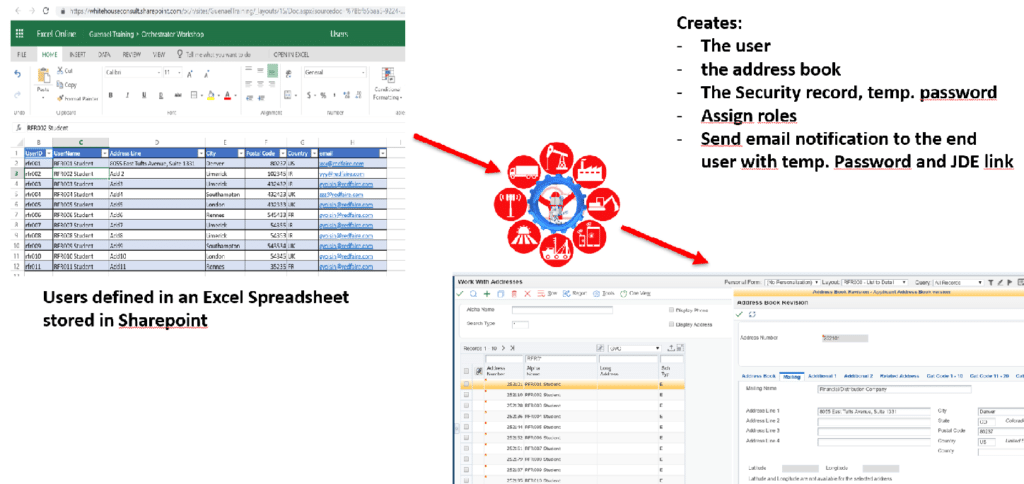
This post starts a serie of posts describing how we could use Orchestrator to automatically create JD Edwards users (and security) using the Orchestrator.
We’ll start from an Excel spreadsheet stored in a Sharepoint portal and automatically:
- read the Excel spreadsheet
- create the users in our internal LDAP (we are using OID but it could work with all LDAP)
- create the users, their address books and role relationships records in JD Edwards
- send an email to each end user including the JD Edwards link and credentials
I designed this orchestration to manage the users in our training environment for our Citizen Developer Courses and it now saves me lots of time and effort to manage new users : I only enter the students information in the Excel file and they receive automatically an email with all the information they need (URL, credentials) just before we start the course !

Before I go further I must admit this was kind of a challenge to achieve this result and I learned a lot about Orchestrator, and its limitations, in the process.
In this post we will cover the Excel part : how can we create an Orchestration to read an Excel spreadsheet stored in Sharepoint ?
1. Create the Excel file stored in Sharepoint
I used our Sharepoint portal to create an Excel spreadsheet where I can enter the required attendees information:
- E1 UserId
- User Name
- Company
- Address Line
- City
- Postal Code
- Country

This file is stored in a Sharepoint site, in a specific folder.
2. Create an Application ID and Client Secret
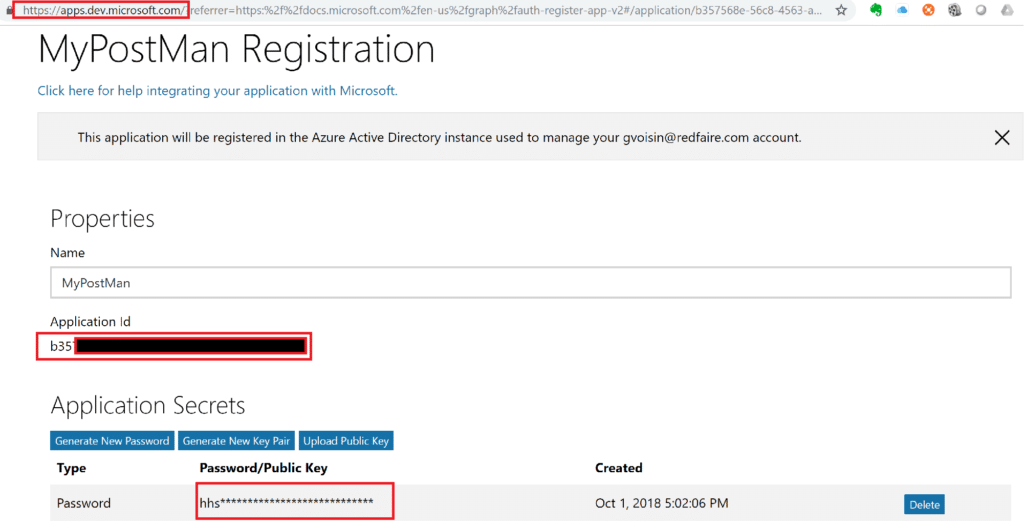
Before we can call a REST API and read our Excel file we need to gather a Client Id and Client Secret from Microsoft Developer portal:
- connect to Microsoft App Registration Portal using you Microsoft account
- create an application and retrieve the Application Id and password secret
3. Read the Excel file using Microsoft Graph API
The Orchestration we’ll create later will need to read this Excel file stored in SharePoint.
If you are already familiar with Orchestrator you may know we can create Connector Service Requests to call external REST API; that’s what we’ll be using thanks to Microsoft Graph
Microsoft Graph gives you access to many Microsoft services using REST API:
Azure Active Directory
Office 365 services
- SharePoint
- OneDrive
- Outlook/Exchange
- Microsoft Teams
- OneNote
- Planner
- Excel
Windows 10 services
- Activities
- …
That’s what we’ll use to read our Excel Spreadsheet; the REST API URL will look like this:
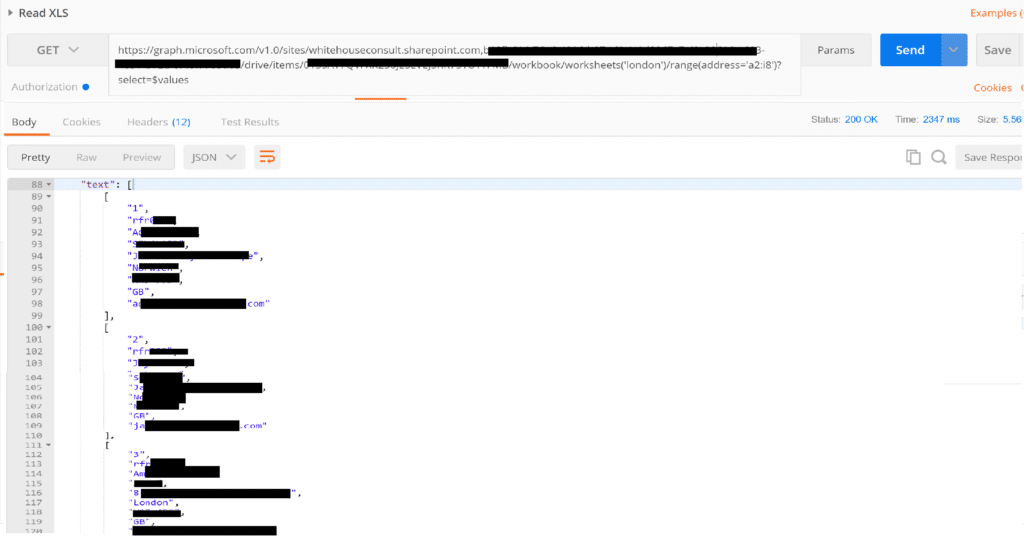
https://graph.microsoft.com/v1.0/sites/whitehouseconsult.sharepoint.com,<Sharepoint Portal ID>/drive/items/<Parent Folder Id>/workbook/worksheets('users')/range(address='a2:i8')?select=$values
After struggling a little bit with Microsoft REST APIs and Oauth 2.0 authentication I was finally able to build the REST API (URL and headers) and retrieve the Excel file content with Postman (a must have for REST API development !):
I discovered that Graph Authentication requires Oauth 2.0 but a quick look at E1 Orchestrator documentation showed me this is supported : https://docs.oracle.com/cd/E53430_01/EOTOT/manage_orchestration.htm#EOTOT590
4. Create the Connection record
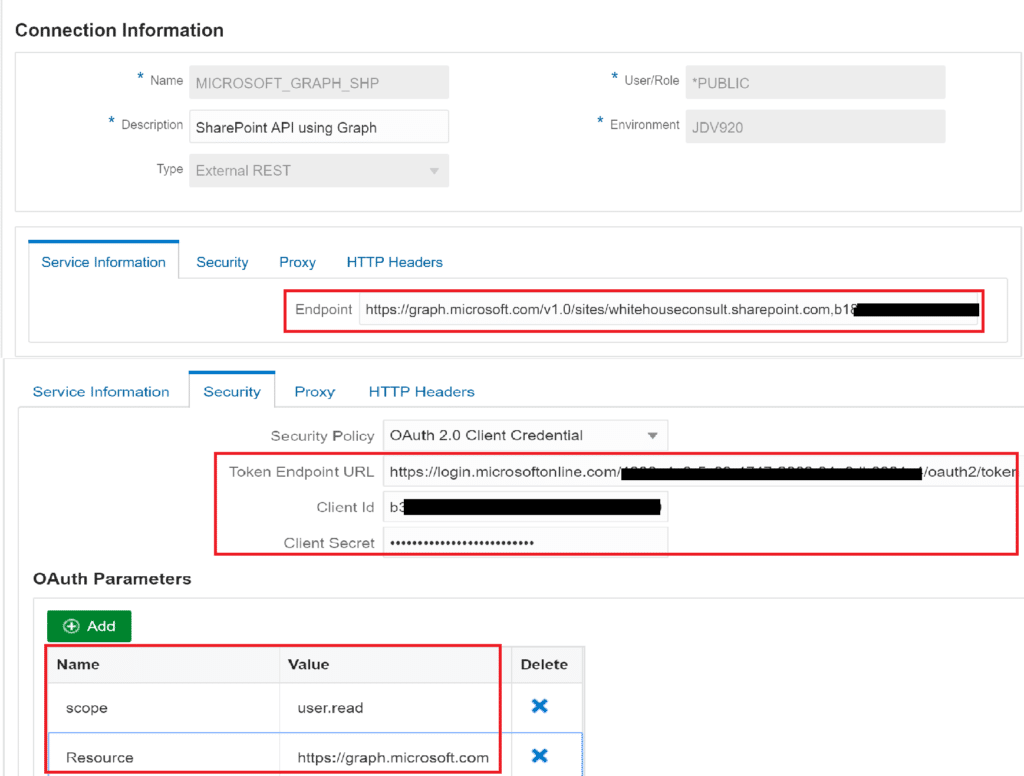
We are now ready to create in Orchestrator the new connection:
EndPoint : https://graph.microsoft.com/v1.0/sites/whitehouseconsult.sharepoint.com,**Your SharePoint Portal ID**
Security :
Oauth 2.0 Client Credential
- Token EndPoint URL : https://login.microsoftonline.com/**Your SharePoint Portal ID** /oauth2/token
- Client Id :
- Client Secret :
OAuth Parameters:
- scope : user.read
- Resource : https://graph.microsoft.com
5. Create the Connector Service Request
It is now time to call the API and retrieve the list of users we’ll need to create in our JD Edwards instance.
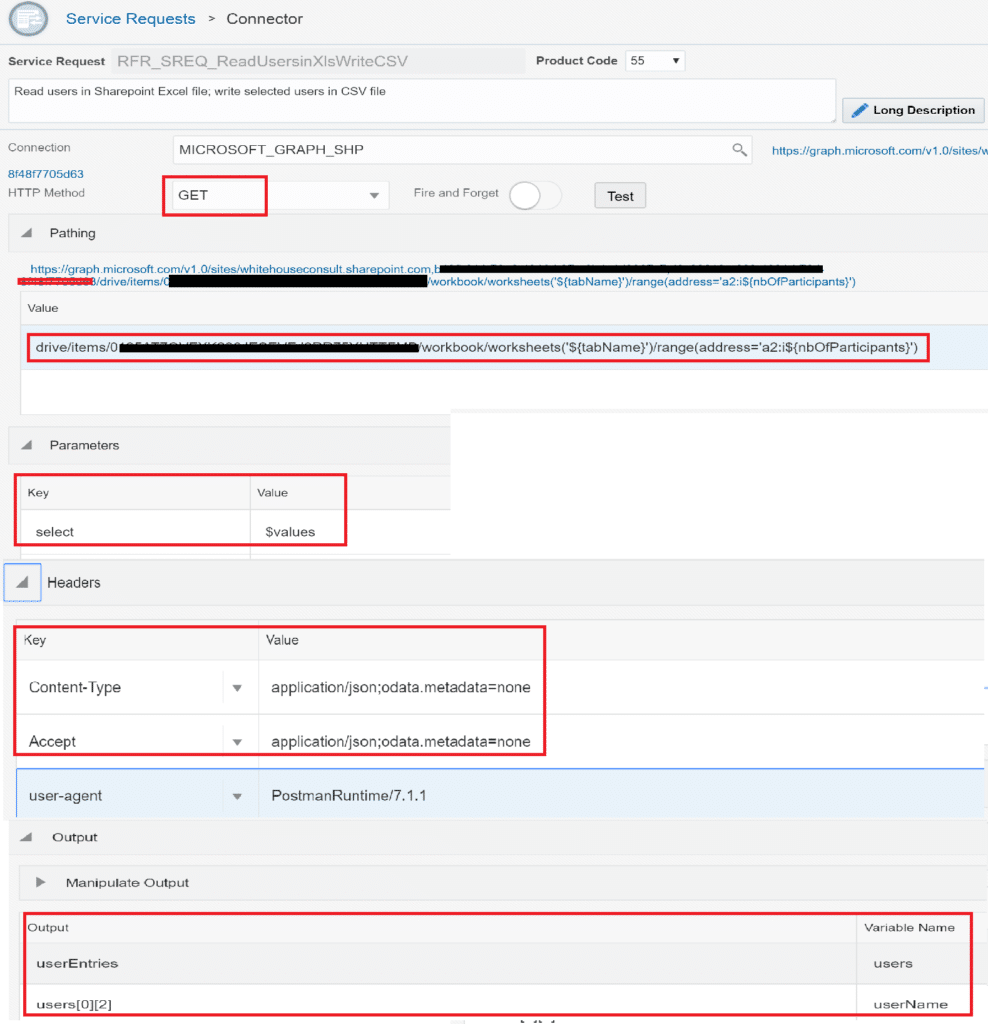
Create a new Service Request with:
Connection : MICROSOFT_GRAPH_SHP (connection created in chapter 3.)
HTTP Method : GET
Pathing : drive/items/**Excel Document Id**/workbook/worksheets(‘${tabName}’)/range(address=‘a2:i${nbOfParticipants}‘)
this path uses 2 variables :
- tabName : select the correct tab in the Excel file (I’ll have 1 tab created for each new training session
- nbOfParticipants: number of lines to read in my Excel tab
Parameters : Graph API parameter to only retrieve the values from the Excel file
- key = select
- Value = $values
Headers :
- Content-Type = application/json;odata.metadata=none
- Accept = application/json;odata.metadata=none
- user-agent = PostmanRuntime/7.1.1
Output :
- Output : values
- Variable Name : values
Here is our Service Request:
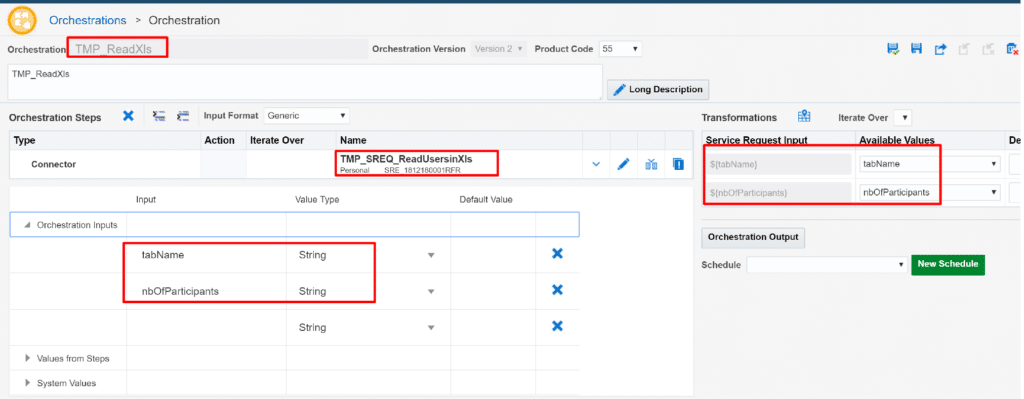
We can now create a simple orchestration to call this Service Request with 2 parameters:
- tabName
- nbOfParticipants
If we test it using Orchestrator Client we retrieve the users information from the Excel file:
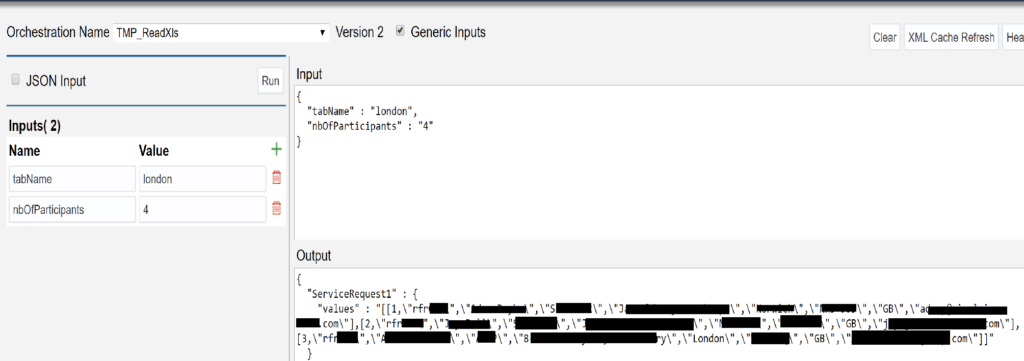
Great, isn’t it ?
We now have an orchestration to read an Excel file and we can retrieve the users information for our next steps : creating JD Edwards users.
But … There is a big issue : the result returned by the Service Request is a string and not an array so we can’t reuse it for the next Service Requests !!!
Unfortunately a Connector Service Request cannot return an array (even with latest Orchestrator 7.0.0) …
It could be a show stopper but I really wanted to automate this process so I found a workaround involving:
- a manipulated output in the Service Request : instead of returning the string, we’ll export the content in a CSV file
- a new Connector Service Request to retrieve this CSV file and import the content as an array (new feature in Orchestrator 7.0.0)
I know this is a pity we have to deal with to those additional steps but this is also a good opportunity to discover the new feature : retrieve a CSV file from a FTP server and automatically import the content in an array.
6. Export the users in a CSV file
Thanks to this tutorial : Creating an Orchestration to Export EnterpriseOne Data to CSV, JSON, and XML Formats, I learned how I can generate a CSV file using Groovy script in the Service Request output.
Here is the Groovy script which creates the file usersTraining.csv with all users information:
import groovy.json.JsonSlurper;
import groovy.json.JsonBuilder;
// IMPORT CSVFormat AND CSVPrinter CLASSES
import org.apache.commons.csv.CSVFormat;
import org.apache.commons.csv.CSVPrinter;
import com.oracle.e1.common.OrchestrationAttributes;
String main(OrchestrationAttributes orchAttr, String input)
{
   HashMap < String, Object > returnMap = new HashMap < String, Object > ();
   returnMap.put("CSVcreated", "false");
  def jsonIn = new JsonSlurper().parseText(input);
  def jsonData = jsonIn.values;
  if (jsonData.size() == 0) {
    returnMap.put("JSONComplete", "empty");
    return returnMap;
  }
  // DEFINE OUTPUT CSV FILE
  def fileName = "/home/oracle/usersTraining.csv";
  returnMap.put("CSVOutFileName", fileName);
  // START CLASS WRITER
  def sw = new StringWriter();
  // BUILD CSV FILE WITH HEADER COLUMNS
  def csv = new CSVPrinter(sw, CSVFormat.DEFAULT.withHeader("userId", "userName", "userFullName", "userAddressLine1", "userCity", "userPostalCode", "userCountryCode", "userEmail"));
  // CREATE OUTPUT FILE
  fileCsvOut = new File(fileName);
  def jsonBuilder = new JsonBuilder()
  def count = 0;
  // BUILD THE ARRAY FROM THE JSON RETURNED BY THE GRAPH API
  def userEntries = new ArrayList();
  for (int i = 0; i < jsonData.size(); i++) {
    def userId = jsonData[i][1];
    count++;
    def userEntry = new HashMap();
        userEntry.put("userId", jsonData[i][1]);
        userEntry.put("userName", jsonData[i][2]);
        userEntry.put("userFullName", jsonData[i][3]);
        userEntry.put("userAddressLine1", jsonData[i][4]);
        userEntry.put("userCity", jsonData[i][5]);
        userEntry.put("userPostalCode", jsonData[i][6]);
        userEntry.put("userCountryCode", jsonData[i][7]);
        userEntry.put("userEmail", jsonData[i][8]);
        userEntries.add(userEntry);
    // WRITE NEW LINE
    csv.printRecord(jsonData[i][1], jsonData[i][2], jsonData[i][3], jsonData[i][4], jsonData[i][5],
                   jsonData[i][6], jsonData[i][7], jsonData[i][8]);
  }
  // DEFINE NEW OUTPUT VARIABLES userEntries - JUST FOR DEBUG
  jsonBuilder(userEntries: userEntries);
  def output = jsonBuilder.toPrettyString();
   // CLOSE THE FILE
  csv.close();
  // WRITE CSV TO FILE
  fileCsvOut.withWriter('UTF-8') {
    writer ->
    writer.write(sw.toString())
  }
  return jsonBuilder.toString();
}
7. Retrieve the CSV file as an array
Now that we can generate the temporary CSV file, we’ll create a last Connector Service Request to:
- retrieve the CSV file using SFTP (we’ll create a new FTP connection for that)
- automatically import the content in an array.
Create the FTP Connection
the CSV file is created on the server where the AIS Server runs. We’ll create a SFTP connection to this server:
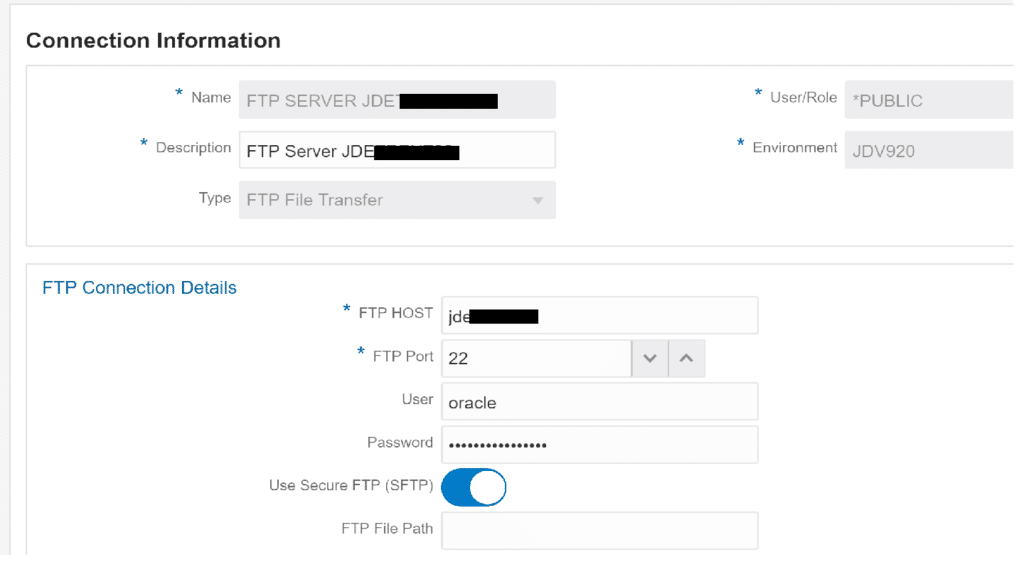
Create the Connector Service Request
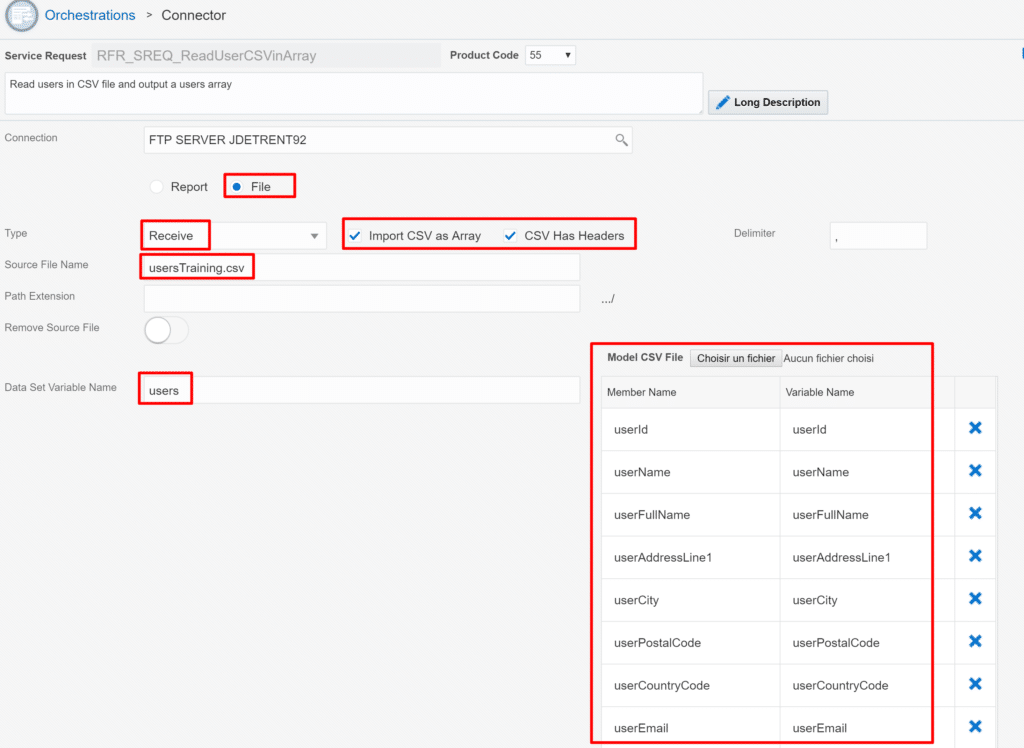
We create a new Connector Service Request to retrieve the CSV file and generate the array (data set) users[]:
We just need to define :
the connection : SFTP connection created earlier
Type : Receive
check:
- Import CSV as Array (new with Orchestrator 7.0.0)
- CSV has headers
Source File Name : usersTraining.csv (file created in the previous Service Request)
Data Set Variable Name : users (our output variable)
- variables mapped from the CSV file (userId, userName, …)
Note : we don’t need to define all the variables manually; just upload a sample CSV file and the array fields are automatically created for you.
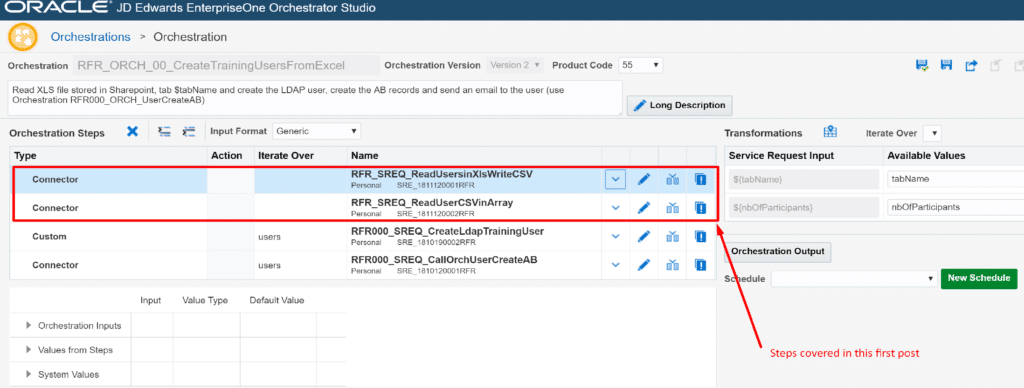
With those 2 Service Requests, we now have our 2 first steps to automate the users creation in JD Edwards.
With the next post, we’ll see how we can reuse the users array to:
- create each user in our LDAP
- create the address book, users, security, roles records in JD Edwards
- send an email to each user with all the information needed to connect to our JDE environment
Here is the final orchestration we’ll have at the end :
If you have questions or specific business requirements close to this post, you can contact me.

